

How To Use Magic Wand Photoshop

The Magic Wand Tool In Photoshop
The Magic Wand Tool, known simply as the Magic Wand, is ane of the oldest choice tools in Photoshop. Unlike other choice tools that select pixels in an image based on shapes or by detecting object edges, the Magic Wand selects pixels based on tone and color. Many people tend to get frustrated with the Magic Wand (giving information technology the unfortunate nickname "tragic wand") because information technology can sometimes seem like it's impossible to control which pixels the tool selects.
In this tutorial, nosotros're going to look beyond the magic, discover how the wand really works, and learn to recognize the situations that this aboriginal but still extremely useful choice tool was designed for.
How To Use The Magic Wand Tool
Selecting The Magic Wand
If you're using Photoshop CS2 or earlier, you tin can select the Magic Wand simply by clicking on its icon in the Tools palette. In Photoshop CS3, Adobe introduced the Quick Selection Tool and nested it in with the Magic Wand, and so if you're using CS3 or afterwards (I'm using Photoshop CS5 here), you'll need to click on the Quick Selection Tool in the Tools panel and keep your mouse push button held downward for a 2d or 2 until a fly-out menu appears. Select the Magic Wand from the menu:
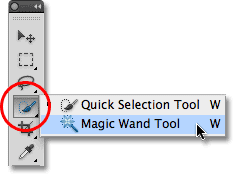
The Magic Wand is nested backside the Quick Selection Tool in Photoshop CS3 and later.
The "Magic" Behind The Wand
Before we look at a real world example of the Magic Wand in activity, let's meet how the tool works and how there'southward really nothing magical almost it. Here's a unproblematic image I've created showing a blackness to white gradient separated past a solid red horizontal bar through its center:
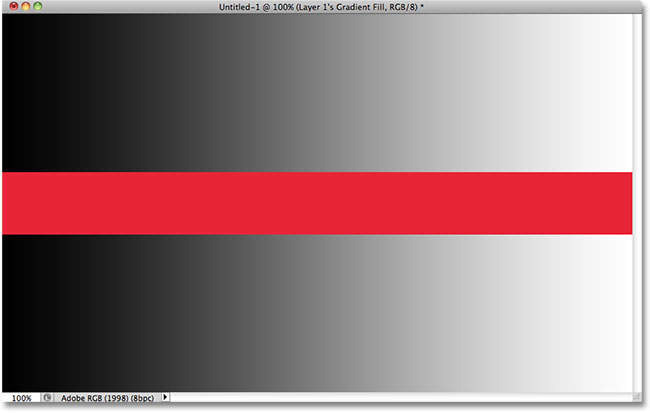
A simple gradient divided by a blood-red bar, only you knew that already.
As I mentioned, Photoshop's Magic Wand selects pixels based on tone and color. When we click on an surface area in the image with the tool, Photoshop looks at the tone and color of the area we clicked on and selects pixels that share the aforementioned color and brightness values. This makes the Magic Wand infrequent at selecting big areas of solid color.
For example, let's say I want to select the horizontal cherry-red bar. All I need to exercise is click anywhere on the reddish bar with the Magic Wand. Photoshop will see that I've clicked on an expanse of crimson and volition instantly select every pixel in the paradigm that shares that aforementioned shade of scarlet, effectively selecting the ruby-red bar for me merely by clicking on it:
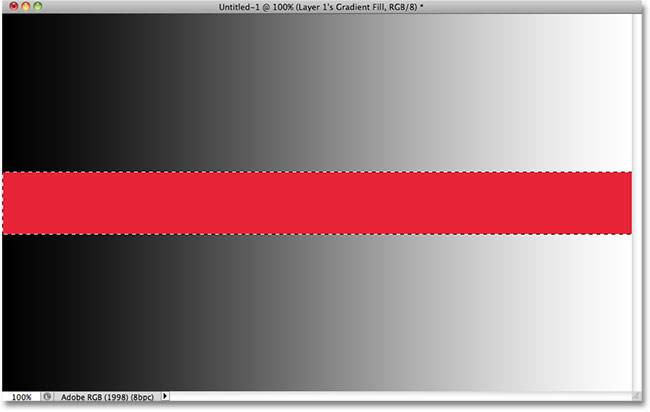
Ane click with the Magic Wand is all information technology took to select the entire ruby bar.
Tolerance
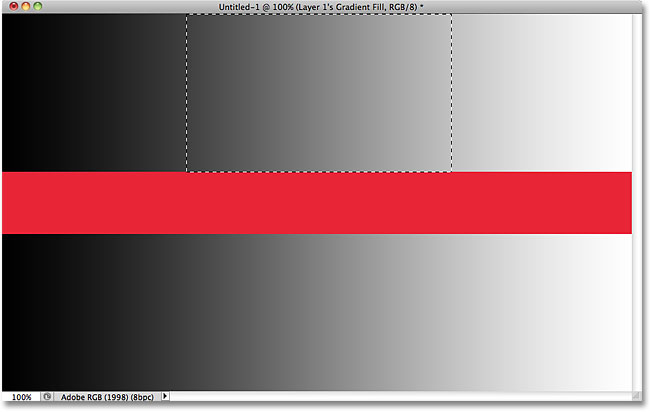
Selecting the solid colored cerise bar was like shooting fish in a barrel enough, since there were no other pixels in the image that shared the same shade of red, but let's encounter what happens if I click with the Magic Wand on one of the gradients. I'll click on an surface area of middle greyness in the eye of the gradient in a higher place the red bar:
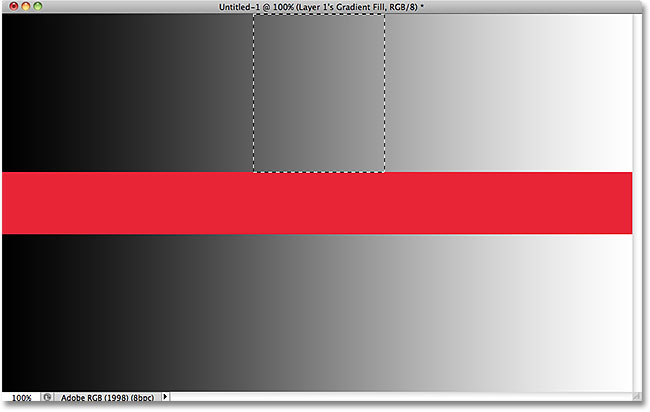
The selected area after clicking in the middle of the upper slope.
This time, Photoshop selected an entire range of effulgence values rather than limiting itself to pixels that were exactly the same tone and colour equally the heart gray expanse I clicked on. Why is that? To find the reply, we need to look upwardly in the Options Bar forth the elevation of the screen. More specifically, nosotros demand to await at the Tolerance value:

The Magic Wand's Tolerance selection.
The Tolerance pick tells Photoshop how different in tone and color a pixel tin can exist from the area nosotros clicked on for information technology to exist included in the choice. By default, the Tolerance value is set to 32, which means that Photoshop volition select any pixels that are the same color as the expanse nosotros clicked on, plus whatsoever pixels that are up to 32 shades darker or 32 shades brighter. In the case of my gradient, which contains a total of 256 brightness levels between (and including) pure black and pure white, Photoshop selected the unabridged range of pixels that barbarous between 32 shades darker and 32 shades brighter than the shade of grey I initially clicked on.
Let's see what happens if I increase the Tolerance value and endeavour again. I'll increment information technology to 64:

Doubling the Tolerance value from 32 to 64.
With Tolerance now set twice every bit high equally it was originally, if I click with the Magic Wand on the verbal same center spot in the gradient, Photoshop should now select an area twice as big as it did last time, since it will include all the pixels that are between 64 shades darker and 64 shades lighter than the initial shade of gray I click on. Certain enough, that's what we get:
This time, with a Tolerance setting twice as high, the selected area of the slope is twice as large.
What if I desire to select just the specific shade of greyness I click on in the slope and nothing else? In that case, I'd prepare my Tolerance value to 0, which tells Photoshop non to include whatsoever pixels in the selection except those that are an verbal match in colour and tone to the expanse I click on:

Setting the Tolerance value to 0.
With Tolerance set to 0, I'll click again on the aforementioned spot in the center of the gradient, and this time, we get a very narrow selection outline. Every pixel that'south not an exact friction match to the specific shade of greyness I clicked on is ignored:

Increasing or decreasing the Tolerance value has a big bear upon on which pixels in the paradigm are selected with the Magic Wand.
You lot can set the Tolerance option to any value between 0 and 255. The higher the value, the wider the range of pixels that Photoshop will select. A Tolerance setting of 255 will effectively select the entire image, and then y'all'll usually desire to try a lower value.
Face-to-face
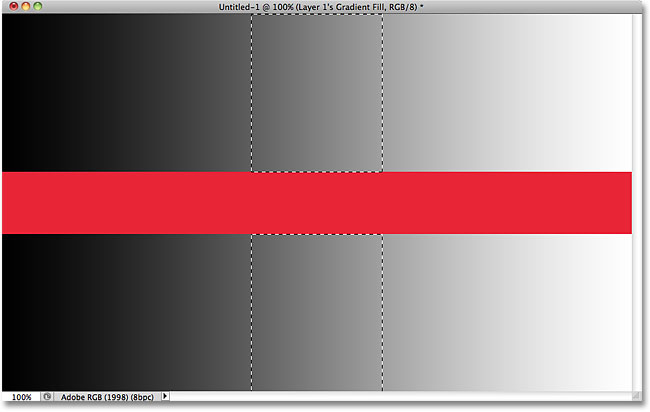
As we were exploring the effect the Tolerance setting has on Magic Wand selections, y'all may have noticed something strange. Each time I clicked on the gradient above the red bar, Photoshop selected a sure range of pixels but just in the gradient I was clicking on. The gradient below the red bar, which is identical to the gradient I was clicking on, was completely ignored, even though information technology patently contained shades of grayness that should have been included in the selection. Why were the pixels in the lower gradient not included?
The reason has to do with some other important option in the Options Bar - Contiguous. With Face-to-face selected, as information technology is past default, Photoshop will only select pixels that fall inside the acceptable tone and color range adamant past the Tolerance option and are side by side each other in the aforementioned area you lot clicked on. Any pixels that are within the adequate Tolerance range only are separated from the area you lot clicked on by pixels that fall outside the Tolerance range will non be included in the selection.
In the case of my gradients, the pixels in the bottom slope that should otherwise have been included in the pick were ignored because they were cut off from the surface area I clicked on by the pixels in the red bar which were not within the Tolerance range. Let'southward run across what happens when I uncheck the Contiguous option. I'll too reset my Tolerance setting to its default value of 32:

Contiguous is selected by default. Click inside the checkbox to deselect it if needed.
I'll click over again in the center of the upper gradient with the Magic Wand, and this time, with Contiguous unchecked, the pixels in the bottom slope that fall within the Tolerance range are likewise selected, even though they're however separated from the area I clicked on past the red bar:
With Contiguous unchecked, any pixels anywhere in the image that fall within the Tolerance range will be selected.
Upwards next, we'll look at some additional options for the Magic Wand and a existent world example of it in activity equally we use information technology to quickly select and supersede the sky in a photo!
Shortcodes, Deportment and Filters Plugin: Error in shortcode [ads-nuts-center]
Boosted Options
Tolerance and Contiguous are the two options that have the biggest impact on the Magic Wand, but there's a couple of other options worth noting. Since the Magic Wand selects pixels and pixels are square-shaped, our selection edges can sometimes announced harsh and jagged, oftentimes referred to as a "stair stepping" effect. Photoshop tin smooth out the edges by applying a slight blur to them, a process known as anti-aliasing. We can turn anti-aliasing for the Magic Wand on and off by checking or unchecking the Anti-allonym option in the Options Bar. By default, it's enabled and in most cases y'all'll want to leave it enabled:

Leave anti-aliasing enabled with the Magic Wand to smooth out otherwise jagged selection edges.
Also by default, when y'all click on an prototype with the Magic Wand, it looks for pixels to select just on the layer that's currently active in the Layers panel. This is ordinarily what we want, only if your certificate contains multiple layers and y'all desire Photoshop to include all the layers in your selection, select the Sample All Layers option in the Options Bar. It's unchecked by default:

Leave Sample All Layers unchecked to limit your selection to the active layer.
Shortcodes, Actions and Filters Plugin: Error in shortcode [ads-basics-eye-two]
Existent World Example
Here'due south an image I accept open up in Photoshop. I similar the photo in general, but the heaven could expect more interesting. I think I'll replace the sky with a different one:
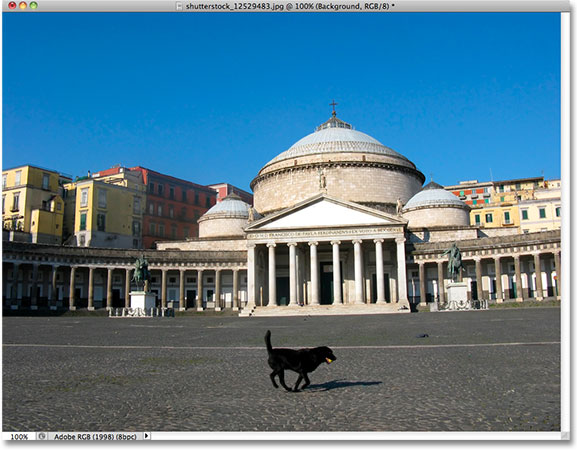
The clear blue heaven looks a bit bland.
Replacing the sky means I'll offset need to select it. As I mentioned earlier, the Magic Wand excels at selecting large areas of solid color, and since the heaven is articulate blue with only a slight variation in the tone, the Magic Wand volition make selecting it easy. With the tool selected and all of its options in the Options Bar set back to their defaults (Tolerance 32, Contiguous checked), I'll click somewhere in the height left of the image:
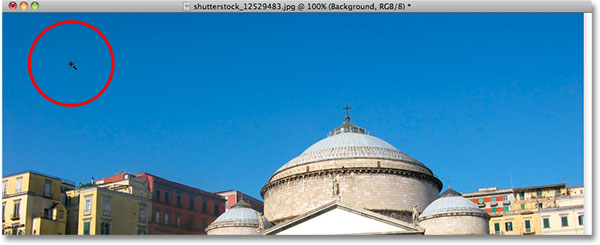
Clicking with the Magic Wand in the pinnacle left of the sky.
If the heaven had been solid blue, the Magic Wand would have had no trouble selecting all of it with that one single click. All the same, the heaven actually transitions from a lighter shade of bluish merely above the buildings to a darker shade near the top of the photograph, and my Tolerance value of 32 wasn't quite high plenty to cover that entire range of tonal values, leaving a big area of the sky directly above the buildings out of the selection:
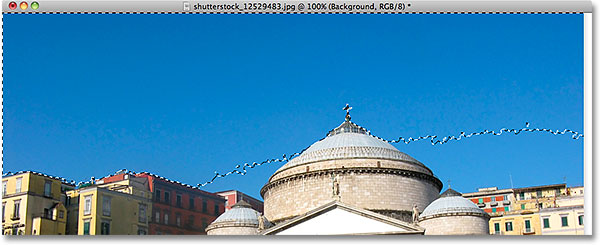
Some lighter areas of the heaven just above the buildings were not included in the selection.
Adding To Selections
Since my initial attempt failed to select the entire sky because my Tolerance value was too depression, I could try once more with a college Tolerance value, but in that location's an easier way to fix the problem. As with Photoshop's other selection tools, the Magic Wand has the option to add together to existing selections, which means I can go along the selection I've started with and simply add together more than of the sky to information technology!
To add to a selection, hold downwardly your Shift cardinal and click in the area y'all need to add. You lot'll see a small plus sign (+) announced in the bottom left of the Magic Wand's cursor icon letting you know yous're most to add to the option. In my case, with Shift held downwardly, I'll click somewhere inside the heaven that wasn't included in the selection initially:
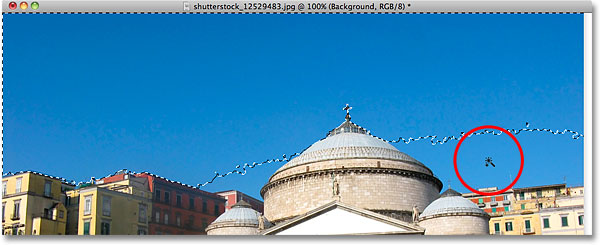
Holding the Shift key downwardly and clicking on the area I need to add.
And just like that, Photoshop was able to add together the remaining area of the sky to the option. Ii clicks with the Magic Wand was all information technology needed:

The entire heaven is at present selected.
Selecting What You Don't Want First
Of course, since the heaven is being replaced, what I should accept selected in the epitome was everything below the sky, since that's the area I desire to go along. But drawing a selection outline along the tops of the buildings with ane of Photoshop'due south other selection tools similar the Polygonal Lasso Tool or the Magnetic Lasso Tool would take taken more time and effort, while selecting the sky with the Magic Wand was quick and easy. This brings us to a pop and very handy technique to use with the Magic Wand, which is to select the area yous don't desire offset then invert the selection!
To invert the selection, which volition select everything that wasn't selected (in my case, everything below the sky) and deselect everything that was (the sky itself), go up to the Select carte at the top of the screen and choose Inverse. Or, for a faster manner to invert selections, employ the keyboard shortcut Shift+Ctrl+I (Win) / Shift+Control+I (Mac):

Go to Select > Changed.
With the selection now inverted, the sky is no longer selected while everything beneath it in the image is:
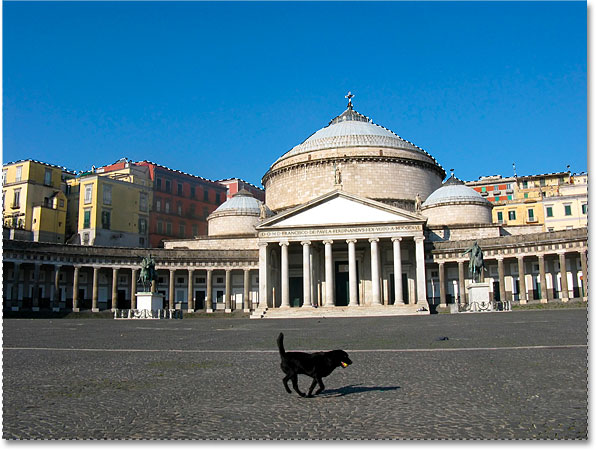
The area I need to keep is now selected.
To replace the sky at this signal, I'll printing Ctrl+J (Win) / Command+J (Mac) to quickly copy the area I'1000 keeping to a new layer in the Layers panel:
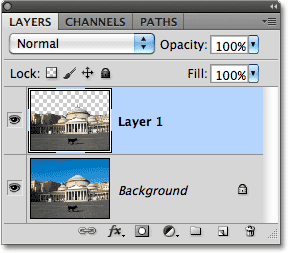
The option has been copied to a new layer above the original image.
Next, I'll open the image I desire to replace the original sky with. I'll press Ctrl+A (Win) / Command+A (Mac) to rapidly select the unabridged image, then Ctrl+C (Win) / Control+C (Mac) to copy it to the clipboard:
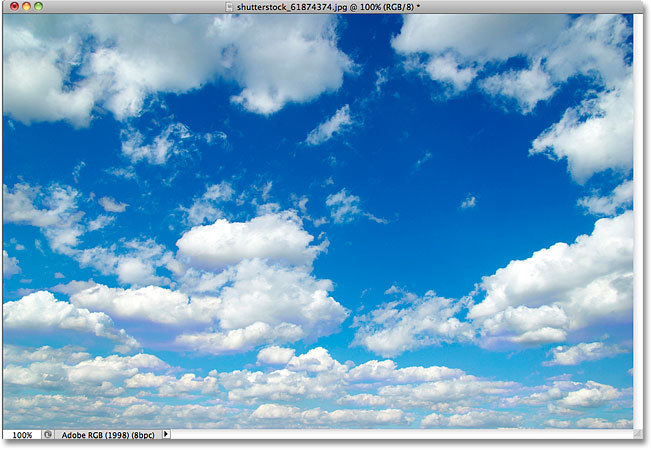
The photo that will replace the sky in the original image.
I'll switch back over to my original image and I'll click on the Background layer in the Layers panel to select information technology so that, when I paste the other heaven photograph into the document, it will appear between my existing two layers:
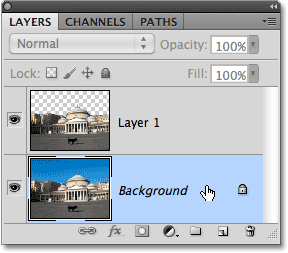
Selecting the Background layer.
Finally, I'll press Ctrl+V (Win) / Control+V (Mac) to paste the new paradigm into the certificate. Anybody loves a blue sky, but sometimes a few clouds can make a bigger impact:

The sky has successfully (and quite easily) been replaced.
Similar Photoshop's other choice tools, the trick to using the Magic Wand successfully and avoiding frustration is knowing when to utilise information technology and when to effort something else. As we've seen in this tutorial, the Magic Wand's biggest strength is its ability to select large areas of pixels that all share the aforementioned or similar color and tone, making it perfect for things like selecting and replacing a simple sky in a photograph, or for whatsoever image where the object you lot demand to select is in front of a solid or similarly colored background. Apply the "select what you don't want get-go" pull a fast one on for times when selecting the area around the object with the Magic Wand would be faster and easier than selecting the object itself with a different tool.
Other Stuff
© 2022 Photoshop Essentials.com.
For inspiration, not duplication.
Site design past Steve Patterson.
Photoshop is a trademark of Adobe Systems Inc.

How To Use Magic Wand Photoshop,
Source: https://www.photoshopessentials.com/basics/selections/magic-wand-tool/
Posted by: laneprouvide.blogspot.com
0 Response to "How To Use Magic Wand Photoshop"
Post a Comment